


How to choose the size?
In the Red Army, sizes were combined and named "rost" (literally: height) for ease of accounting and handling. The SSH-36 helmet was produced in 4 sizes. We offer three sizes of liners: 2, 3 and 4. Determine the size of the liner and select it next to the "Add to cart" button. If the size is not there, then it is now (already) out of stock.
The size of the liner is selected by the stamp inside at the edge of the helmet. The first digit is "rost" (size).
Another option is to determine the size from the helmet measurements. Take a ruler or meter tape measure and first measure the circumference of the helmet from the outside at the level of the holes for the rivets. Then measure two distances between opposite sides in a straight line: the first is between "ears" of the helmet, the second is from the visor to the back of the helmet. Now you can determine the size (height):
- 2nd "rost" or size — the circumference of the helmet is about 65.5 cm, the distance between between "ears" of the helmet is about 25.4 cm, the distance from the visor to the back of the helmet is about 27.9 cm.
- 3rd "rost" or size — the circumference of the helmet is about 68.5 cm, the distance between "ears" of the helmet is 25.7 cm (± 2.5 mm), the distance from the visor to the back of the helmet is 28.7 cm (± 2.5 mm).
- 4th "rost" or size — the circumference of the helmet is about 70.7 cm, the distance between "ears" of the helmet is 25.3 cm (± 2.5 mm), the distance from the visor to the back of the helmet is 30.3 cm (± 2.5 mm).
Description
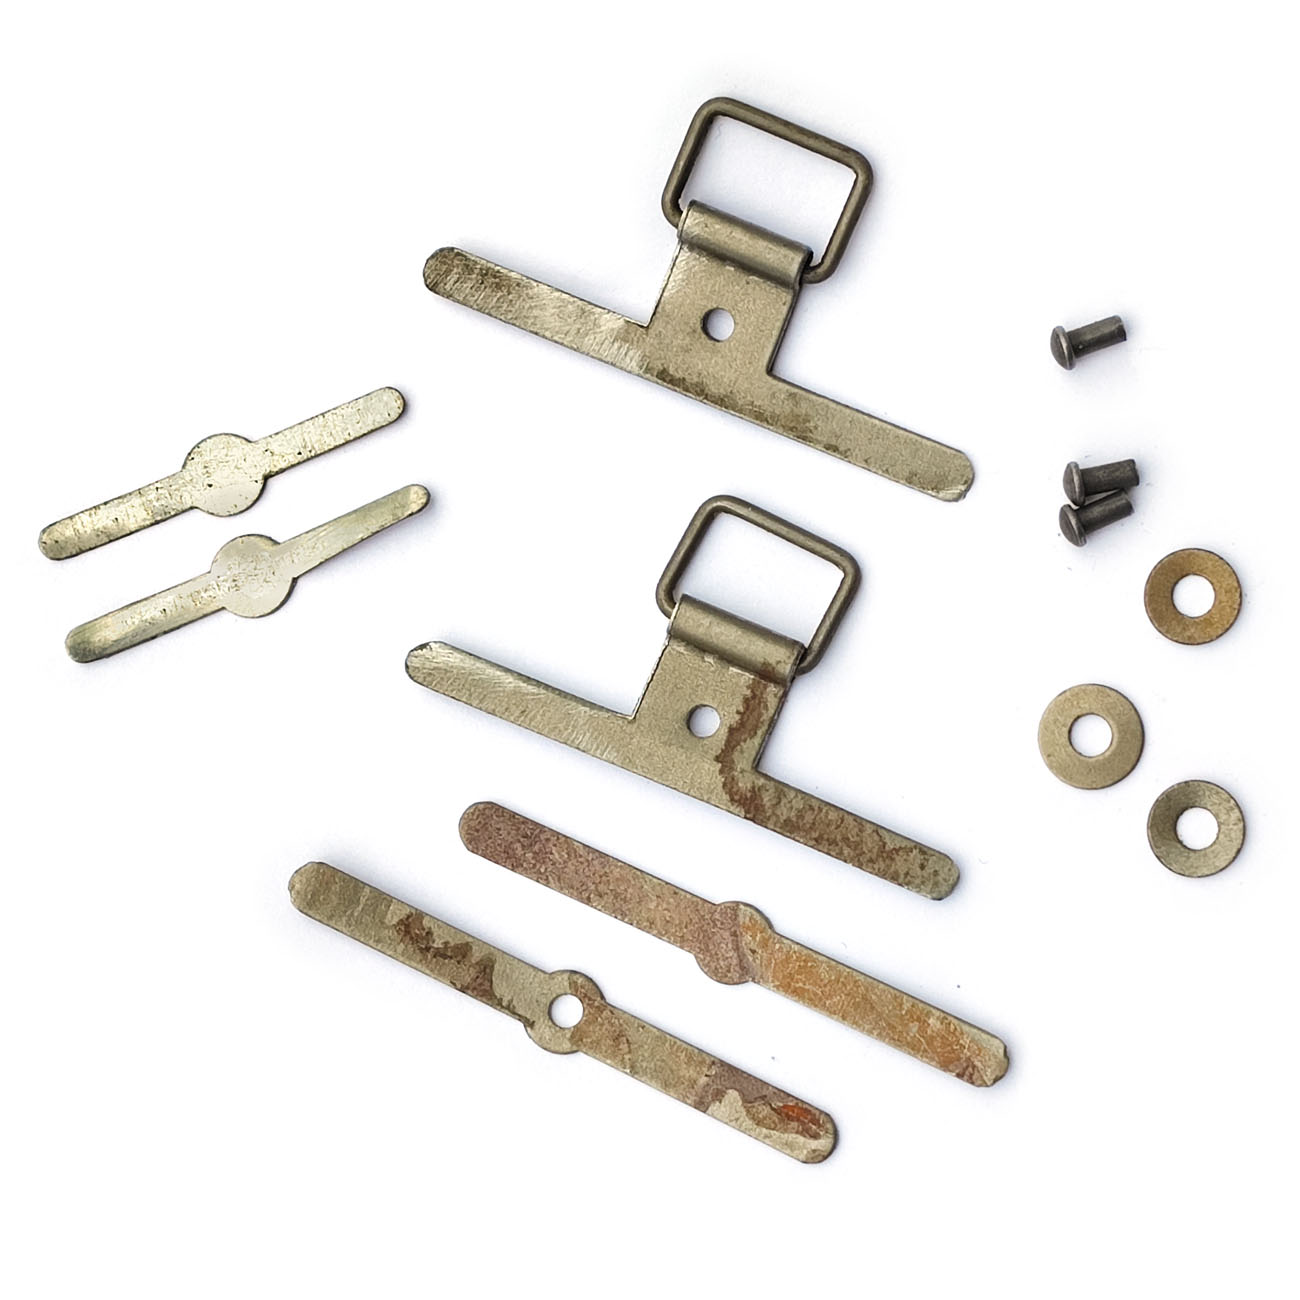
A copy of the liner (amortisation part) for the SSh-36 helmet. The liner kit consists of several parts as below.
- soft part of the liner : leatherette (made of artificial leather) tulle on a rim made of hard cardboard with a rubber or synthetic foam rubber (shock absorber, vault made of historically typical cotton fabric;
- corrugated metal bumper (installed between the helmet and balaclava as a shock absorber and for ventilation);
- a set of accessories for fastening the line (rivets, earrings for the chin strap, mustache fasteners) and a strap to the balaclava (clasps).
The chin strap can be purchased separately on our website. We have 2 types: leather and full canvas.
The cotton arch (soft part) in the upper part is adjustable (adjusted) with a cord for a proper fit on the head (so that the helmet worn on the head does not cover the line of the eyes and so that the crown of the head does not touch the helmet from the inside).
All of these components are sold as a set. You can see all of them in the photo. Price for 1 set.
How to attach the liner to the SSH-36 helmet?
1. Rivet three rivets for the aluminum corrugation. Two of them are located on the sides of the helmet and fasten the helmet and chinstrap fittings at the same time. The third one is in the back.
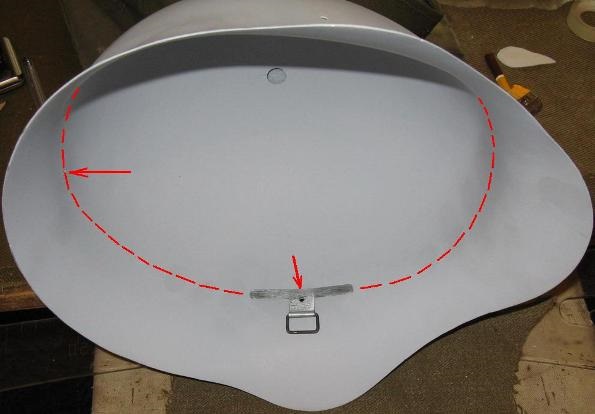
To keep the rivet head round, you need to prepare the working surface (anvil): drill a recess according to the shape of the rivet head. Then connect the parts: rivet, helmet, mustache fasteners on the inside of the helmet. Before finally fixing everything, you need to check whether the mustache is optimally placed for attaching the corrugations. To do this, attach the corrugation with holes to the whiskers on the sides of the rivet and make sure that they are flush with the corrugation holes.
2. Attach the corrugation to the helmet. Connect its ends and "stick" the holes on the mustaches of the fasteners on the sides of the helmet. To do this, you need to bend the mustache in a U-shape. But before bending, attach the corrugation and adjust the distance under it at which the ends of the mustache will be bent (the width of the U-shape) so that the corrugation easily docks with the mounts and helmet without gaps. With the back mustache we fasten the corrugation with an overlap.
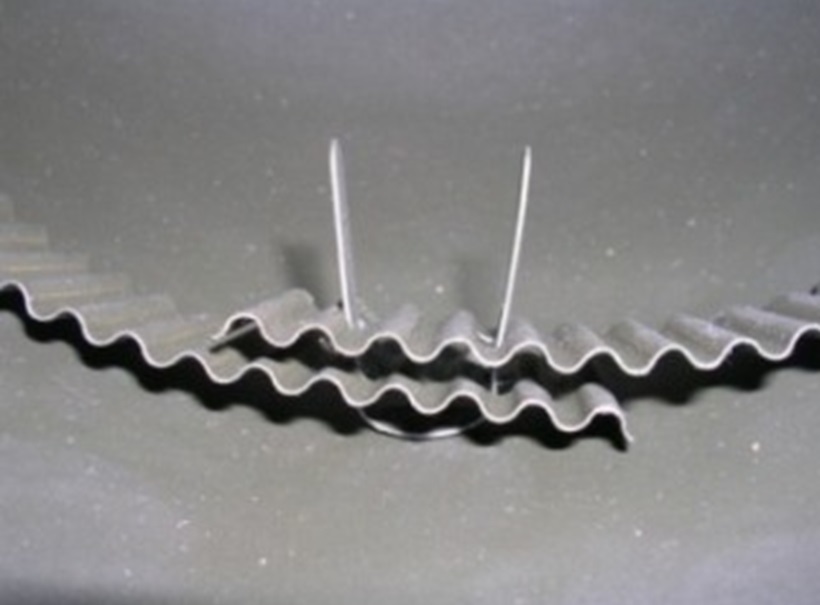
It happens that the corrugation as it is does not fit very tightly to the helmet when joining the holes. Then you can stretch it a little or even file to widen the holes in it. So that in the end the liner sits in the best way. After fastening, the corrugation can be slightly pressed against the helmet with your fingers.
3. Paint the helmet and fasteners. If the helmet is in good condition, and it is not planned to paint it, then you can pre-paint the corrugation separately. And after fastening all the details, carefully tint the rivets from the outside.
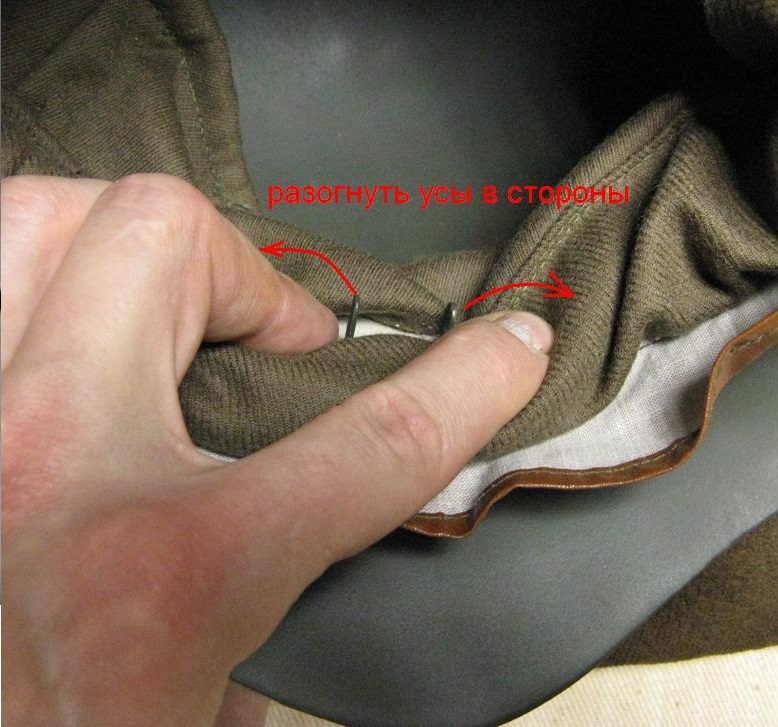
4. It remains to fix the soft part of the helmet. In places of fastening near the helmet, unsewn "pockets" are provided. It is necessary to attach the liner to the helmet, mark the places for the holes for the tips of the mustaches of the mount (so that the unsewn pockets cover the mounts). Holes should be made in pockets so that the fabric covers the pressed ends of the mustache.
And so that the fabric of the pocket does not interfere with making holes in the cardboard and the shock-absorbing sponge, yyou can put the open pocket on a handle or stick, fixing it firmly. And punch holes with a knife or a sharpened screwdriver. Now you can fix the liner by putting holes on the mustache of the fastening, unbend them to the sides and close the pocket fabric.
Historical reference.
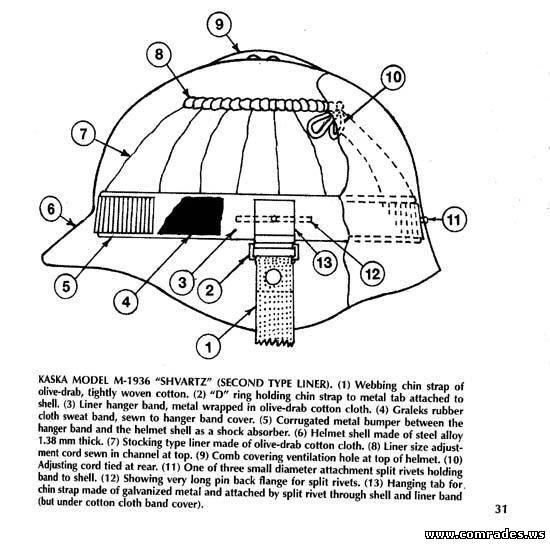
A drawing of a steel helmet of the 1936 model (SSh-36) is below.
Sources: web.archive.org.


 USSR")
 USSR M43")
")

 RKKA")


