How to choose the size?
Discounted leather pieces have minor moth damage on the felt-backing. The face leather surface is completely undamaged; only the inner felt layer is affected. The damage is minor (see photos below) and in most cases is not visible once the leather is fitted to the helmet liner.


Description
Leather detail to the M31 German helmet liner. It consists of leather and a strip of felt (you don't need to buy extra felt, although it is sold from us as a separate product). The thickness of the leather is 1-1.4 mm, the thickness of the felt is about 1.5 mm. Felt can be almost white or gray, gray-brown. It is completed with a cord of the correct thickness. Lace made of artificial materials, do not be shy about this, because the original laces were also not completely natural (the Germans just understood the advantages of synthetic materials and actively introduced them).
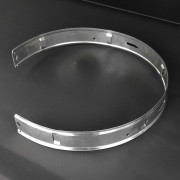
Fits all sizes (length 62 cm, 9 petals). To get the right size, you need to cut off the extra length and sew the leather into a ring. Then you need to tighten the leather on the rim when wet and fix it with metal legs (sold separately). We offer leather parts from different raw materials. They are numbered in the photo:
1) Beige leather stamped 9-40 (September 1940) + name, city of manufacturer. 0.9mm thick, soft, stretches well. When stitching, you need to cut 1-2 cm less than the required size, and after stitching, pull it over the rim. This ensures a crease-free fit. That is, a stitched 58 cm ring should go to a 60 cm rim.

2) Beige leather stamped RB.-Nr. (manufacturer's number, this stamp applied since 1942). The properties are exactly the same as number 1.

3) Dark brown leather. Smooth color and smooth surface, maximum thickness (1.4 mm), firm, almost does not stretch. Stamp 9-40 and manufacturer.
We do not sew leather for a helmet under the size and do not plan to sell stitched, because the liners are different for everyone (although they have one standard).
How to sew the leather?
Take the leather dea, put along the ruler or on the table with a mark in size. It is important to consider the stretching of the leather! When sewn, the leather ring should look beautiful in its final form. If the leather is put on the rim without effort, it will hang in awful folds. Leather stretch differently: some strongly, some almost do not stretch. You should stretch the leather to the limit of its elasticity in order to avoid the "wave" on the ready liner, but at the same time to be able to pull the leather ring on the rim...
Next, make the 1 cm margin from the mark (for hems). Then you need to check how the edges meet. On the original liners, the edges of the leather docked randomly. Often, petals of different lengths were sewn together, making a seam to the end of the longest petal. The reenactor has the ability to "move" marks on the leather detail and to achieve a beautifully docking edges.
And only after that, the leather piece can be cut (usually with a sharp stationery knife along a metal ruler, but it can also be scissors).
Then loose ends of the wool (to dock them when the leather is sewn). Next, sew the leather on a sewing machine or by hand, simulating a machine seam. The thread used is thin white, about 0.3 mm thick. After stitching the edges of the leather, straighten it with fingers, wetting the leather with water, and fix it with hammer blows. Then the loose ends of the wool are docked and fixed by several stitches, so as not to increase the thickness of the seam.
To pull the leather on the liner, you can wet it. Put the ready-made leather liner on the ball or on the dummy's head and let it dry, the leather will take a beautiful spherical shape.
 -40%